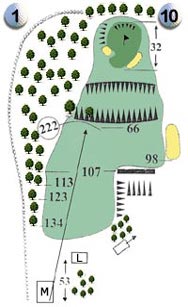
| Hole 1 |
Out of bounds on the left, the dock level to the right, the correct line is to the right of the thorn bush in line with the right hand bunker of the distant green. Low handicappers will take driver but the more canny mid handicappers play 4 iron and a pitch to the green.
WATCH VIDEO |
|
Par |
|
S.I. |
|
Par |
S.I. |
291 |
4 |
278 |
13 |
274 |
4 |
7 |
|
 |
|
Par |
|
S.I. |
|
Par |
S.I. |
291 |
4 |
278 |
14 |
274 |
4 |
8 |
|
|
|
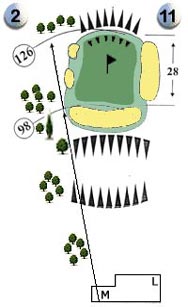
| Hole 2 |
Avoid going over the back of the green as there is a 20 foot drop to the dock level. Use the flags on the port building behind tee to gauge wind strength and direction
WATCH VIDEO |
|
Par |
|
S.I. |
|
Par |
S.I. |
108 |
3 |
104 |
17 |
98 |
3 |
17 |
|
 |
|
Par |
|
S.I. |
|
Par |
S.I. |
108 |
3 |
104 |
18 |
98 |
3 |
18 |
|
|
|
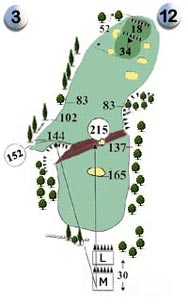
| Hole 3 |
The correct line for the drive is the right hand poplar across the wall and beyond the fairway. Keep to the left of the cotoneaster plant growing in the wall.
WATCH VIDEO |
|
Par |
|
S.I. |
|
Par |
S.I. |
329 |
4 |
321 |
9 |
300 |
4 |
5 |
|
 |
|
Par |
|
S.I. |
|
Par |
S.I. |
329 |
4 |
321 |
10 |
300 |
4 |
6 |
|
|
|
|
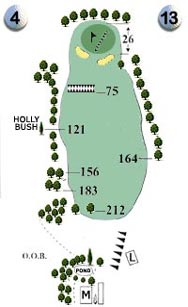
| Hole 4 |
The only blind driving hole on the course. Tee shot is crucial. Aim to the left of the big stand of poplars on the left. Better to be long going into the green. Stay away from the right hand side.
WATCH VIDEO |
|
Par |
|
S.I. |
|
Par |
S.I. |
363 |
4 |
339 |
3 |
301 |
4 |
9 |
|
 |
|
Par |
|
S.I. |
|
Par |
S.I. |
363 |
4 |
339 |
6 |
301 |
4 |
10 |
|
|
|
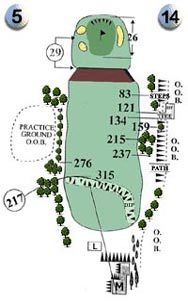
| Hole 5 |
For most normal golfers this is a 3 shot hole to get onto the green. Keep the ball down the middle. Only internal out of bounds on the right of the dock bank.
WATCH VIDEO |
|
Par |
|
S.I. |
|
Par |
S.I. |
535 |
5 |
522 |
5 |
484 |
5 |
1 |
|
 |
|
Par |
|
S.I. |
|
Par |
S.I. |
535 |
5 |
522 |
2 |
484 |
5 |
2 |
|
|
|
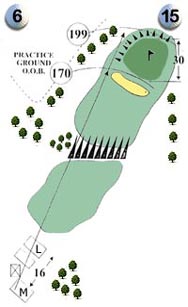
| Hole 6 |
Do not be lulled by the apparent simplicity of the hole. Needs a straight shot to walk off with a three. No artificial hazards but quite a few trees!
WATCH VIDEO |
|
Par |
|
S.I. |
|
Par |
S.I. |
188 |
3 |
172 |
15 |
162 |
3 |
15 |
|
 |
|
Par |
|
S.I. |
|
Par |
S.I. |
188 |
3 |
172 |
16 |
162 |
3 |
16 |
|
|
|
 |
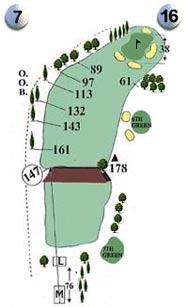
| Hole 7 |
Nice driving hole - dog leg right. Correct line from the tee is the line of poplars over the wall to the left of the steps. Trying to drive the green could land you in deep trouble in the rough behind the 5th green.
WATCH VIDEO |
|
Par |
|
S.I. |
|
Par |
S.I. |
324 |
4 |
312 |
7 |
300 |
4 |
3 |
|
 |
|
Par |
|
S.I. |
|
Par |
S.I. |
324 |
4 |
312 |
8 |
300 |
4 |
4 |
|
|
|
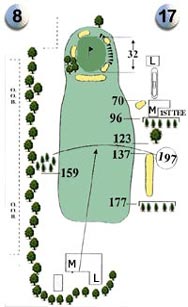
| Hole 8 |
Out of bounds on the left, the dock on the right, many people take a long iron to keep on the fairway followed by a longish mid iron to the green. Better to be long than short to the green.
WATCH VIDEO |
|
Par |
|
S.I. |
|
Par |
S.I. |
334 |
4 |
317 |
11 |
298 |
4 |
11 |
|
 |
|
Par |
|
S.I. |
|
Par |
S.I. |
334 |
4 |
317 |
12 |
298 |
4 |
12 |
|
|
|
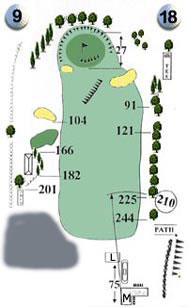
| Hole 9 |
A 420 yard Par 4 which requires a good drive and second shot. Aim for the conifers in front of the bungalow from the tee, and avoid going down into the dock. Better to be to the right than to the left on the second shot.
WATCH VIDEO |
|
Par |
|
S.I. |
|
Par |
S.I. |
439 |
4 |
429 |
1 |
423 |
5 |
13 |
|
 |
|
Par |
|
S.I. |
|
Par |
S.I. |
439 |
4 |
429 |
4 |
423 |
5 |
14 |
|
|
|
It's a straightforward course providing you put your ball in the right place. If you go off line, it usually means trouble. The greens, as mentioned elsewhere, are a joy all the year round. |